::: motto 精进:如何成为一个很厉害的人
当一件事情你不知道该怎么做的时候,那就直接开始做吧,只要开始了第一步,就会有第二步,第三步。
:::
::: tip 转载声明
本文转载自原语云公众号 Lotus snap-deal 功能体验报告。欢迎订阅,第一时间获取技术干货。
:::
Lotus 官方在北京时间 3 月 1 号 23:00:00 将网络升级到了 V15。本次更新的重要功能就是支持 CC 订单的 snap-up 操作。也就是说可以直接将 CC 扇区填充订单,升级为订单扇区。
意味着当前网络 15EiB 垃圾数据都可以变成真实数据存储,意义非凡。 网络升级之后,我们第一时间体验了 snap-deal 功能,然后就有了这份体验报告。
本次测试的主要任务为:
- 熟悉
snap-deal的整个操作流程和步骤。 - 在整个扇区的
snap-up过程中,扇区状态的流转过程是怎样的,以及各个阶段的大概耗时。这便于我们确定应该把这些任务分配到哪些 Worker 上去计算。 - 扇区文件的转移过程,经过了哪些 Worker,分别做了什么更改等。
- 是否有一些隐藏的 Bug。
1. 环境说明
- 操作系统:Ubuntu-20.04 LTS
- 测试网络:Lotus 本地网络
- Lotus 代码版本:v1.14.4,
CommitID: 5b33555fda0a4d6e7f3f35cc06b8d103c4715bea。这里必须要用 v1.14.4 版本,虽然 v1.14.1 就已经支持snap-deal功能但是有 Bug,任务会卡在FinalizeReplicaUpdate状态,这个 Bug 直到 v1.14.4 版本才修复。 我开始测试的时候就被这个问题坑了半天,还以为是自己改代码改出问题了,直到看到官方发布 v1.14.4 版本才知道这是个 Bug。 - 机器配置:
- 创世节点 + 算力机:Intel i7-10700K + 64G RAM + 512G SSD + GeForce GTX 1660
- 证明机:AMD 3950X + 64 RAM + GeForce GTX 1080Ti
我们没有线上的集群可以测试,所以这里我们搭建了一个 8MiB 扇区的本地 lotus 网络。由于 snap-up 的对象必须是 Proving 并且是 Active 的 CC 扇区,所以预密封的扇区是不符合要求的。
为了能快速得到一些通过时空证明验证的 Proving CC 扇区,我们需要先快速密封完 96 个扇区,确保所有的 deadline 都有扇区(本地网络每个 deadline 只有 2 个扇区),这样只需要做一次时空证明,就会得到至少 2 个 Active 的 Proving 扇区。
为什么选择 sector-size 为 8MiB 而不是 2K 或者 512MiB 扇区?
因为 512MiB 太大,用开发机器去封装 96 个扇区还是有点慢,而 2KiB 的扇区又太小,你想存张图片都存不下,8MiB 刚刚好。
在进行 snap-deal 测试之前,请大家自行准备好上述的测试环境,很简单,几条命令就完成了,这里就不赘述了。
2. 集群架构说明
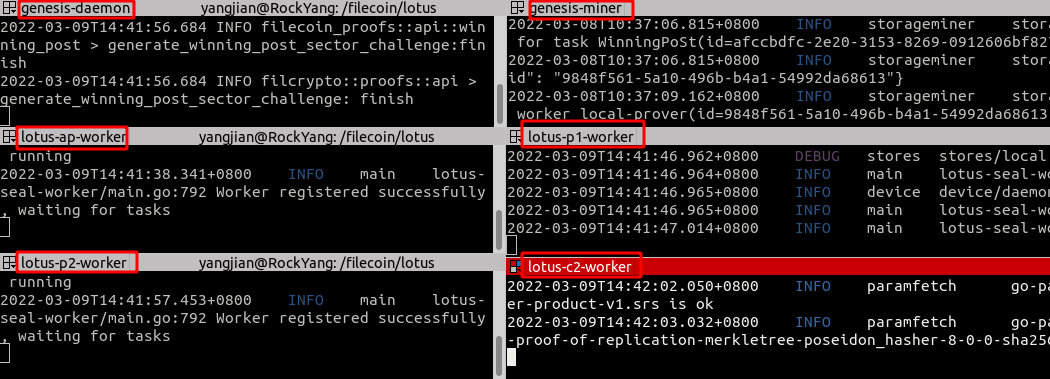
在操作之前,我先把我当前这个集群的架构说一下,我整个集群由 2 台机器组成,我自己的开发机器(Intel i7-10700K)和一台证明机器(AMD 3950x)。
开发机器上一共运行了 6 个 lotus 进程,分别是:
genesis-lotus-daemon: 创世 Lotus 节点
genesis-lotus-miner: 创世 Miner 节点,负责爆块
lotus-ap-worker: 做 AP 任务的 Worker
lotus-p1-worker: 做 PC1/C1 任务的 Worker
lotus-p2-worker: 做 PC2/C1 任务的 Worker
lotus-client: lotus 客户端节点,用来发送订单使用,通常一台机器同时启动 2 个 daemon 节点数据目录和端口会有冲突,通过导出
LOTUS_PATH环境变量同时指定--api参数解决:1
2export LOTUS_PATH=~/.lotus1
lotus daemon --genesis=devgen.car --bootstrap=false --api=12345导出创世节点 P2P 连接地址(新开终端):
1
2
3
4
5lotus net listen
# output
/ip4/192.168.2.100/tcp/39875/p2p/12D3KooWBtZesUZocwW8M1qVmRL75Zj6LumZhMGDWDKoQSHMaQJv
/ip4/127.0.0.1/tcp/39875/p2p/12D3KooWBtZesUZocwW8M1qVmRL75Zj6LumZhMGDWDKoQSHMaQJv
/ip6/::1/tcp/43665/p2p/12D3KooWBtZesUZocwW8M1qVmRL75Zj6LumZhMGDWDKoQSHMaQJv复制内网连接地址,连接创世节点(新开终端):
1
2
3
4
5export LOTUS_PATH=~/.lotus1
# 连接创世节点
lotus net connect /ip4/192.168.2.100/tcp/39875/p2p/12D3KooWBtZesUZocwW8M1qVmRL75Zj6LumZhMGDWDKoQSHMaQJv
# 创建钱包,用于发单
lotus wallet new最后,从创世节点钱包往上述地址充 10000 个FIL(就是这么豪气,随便花),用于发送订单。
在证明机器(AMD 3950X)启动一个
lotus-c2-worker, 整个集群的架构如下图所示:
3. 开始测试
针对 snap-up 功能,官方给 worker 新增了三个类型的任务,分别是replica-update, prove-replica-update2 和 regen-sector-key,我们运行 lotus-worker run --help 可以查看详细说明:
1 | yangjian@RockYang:/filecoin/lotus$ lotus-worker run --help |
打开封装机(这里选择 lotus-p1-worker)的
replica-update和regen-sector-key功能:1
lotus-worker run --replica-update=true --prove-replica-update2=false --regen-sector-key=true
打开证明机(lotus-c2-worker) 的
prove-replica-update2功能:1
lotus-worker run --replica-update=false --prove-replica-update2=true --regen-sector-key=false
标记某个扇区准备进行
snap-up升级,这里再次重申一下,必须是已经Proving且Active的扇区才行。1
2# 我这里选择 80 号扇区,因为这个扇区是最早变成 Active 的
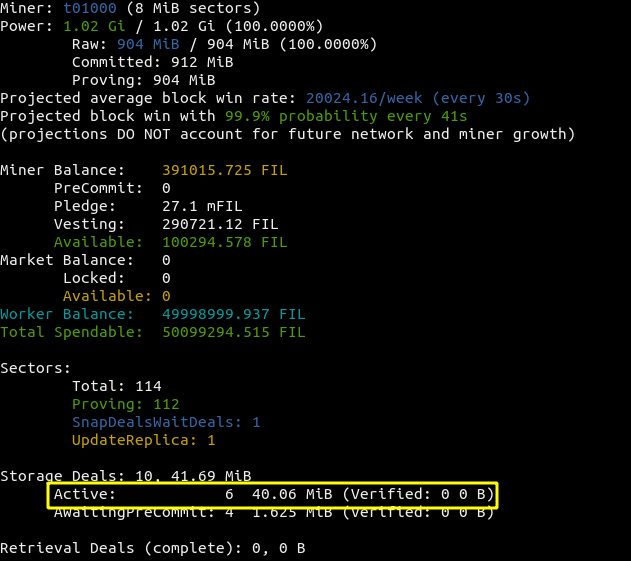
lotus-miner sectors snap-up 80运行之后,我们查看 miner 信息会发现多了一个
SnapDealsWaitDeals任务,表示有一个扇区正在等待snap-deal订单:
::: tip 扩展扇区
如果新收到的交易的持续时间超过当前 Snap-deals 扇区的剩余持续时间,您可以运行以下命令将扇区续期:1
2
3lotus-miner sectors extend --new-expiration=<new-epoch> <sectorNumbers...> && lotus-miner sectors match-pending-pieces
# 续期 80 号扇区
lotus-miner sectors extend --new-expiration=12580 80 && lotus-miner sectors match-pending-pieces**上述命令会自动将订单 Piece 匹配到新续期的扇区并启动
ReplicaUpdate任务。
:::::: info 终止升级
如果你想终止 snap-deal 操作的话,只需执行下面的命令:1
lotus-miner sectors abort-upgrade --really-do-it <sectornumber>
:::
声明 Miner 的 Libp2p 连接地址(
AnnounceAddresses)。首先我们需要在 Miner 的配置文档中打开并更改下面的配置:
1
2
3[Libp2p]
ListenAddresses = ["/ip4/192.168.2.100/tcp/6666", "/ip6/::/tcp/0"]
AnnounceAddresses = ["/ip4/192.168.2.100/tcp/6666"]将上述 IP 地址替换成你本机内网 IP 地址,然后重启 Miner 之后执行声明地址命令:
1
lotus-miner actor set-addrs /ip4/192.168.2.100/tcp/6666
该命令会返回一条上链消息 CID,等消息上链之后你的 Miner 就可以在当前网络接收订单了。
使用客户端向 Miner 发送存储订单:
首先导入数据(新开终端)
1
2
3
4
5# 先导出环境变量,因为我们需要使用 daemon1 的钱包发单
export LOTUS_PATH=~/.lotus1
lotus client import lotus.jpg
# ouput
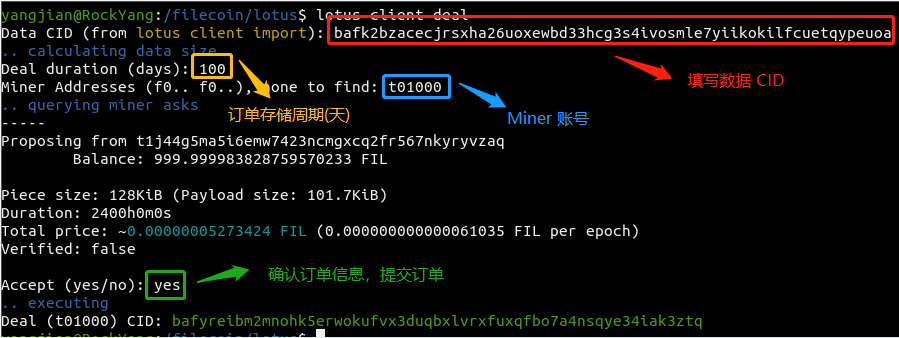
Import 1646705384011290368, Root bafykbzaceaudakoxqanidds7jtgnaxutzhloe3evsatzghckkhiv7ekzeccsg然后发起一笔订单交易,运行
lotus client deal命令,然后根据提示一步一步填写信息就好了:
这里顺带提一下,官方的代码在订单时间过滤的时候有一个问题,他们计算出订单的时间要大于 180 天,而本地 2K 网络扇区的声明周期最大为 180 天,如果你输入一个大于 180 天的值,订单提交之后会报错:
1
2
3Mar 3 07:29:07 unexpected deal status while waiting for data request: 11 (StorageDealFailing). Provider message: deal rejected: deal duration out of bounds (min, max, provided): 518400, 1555200, 1729880
Stage: Failing: Failing (expected duration: )
Mar 3 07:29:07 funds released, amount <6757343750000>源代码在
cli/client.go的 618 行(注意看注释):1
2
3
4
5
6// 这里的 builtin.EpochsInDay 是一个固定值:2880,代表主网每天爆块的数量
// 但是本地网络爆块的时间比较短,默认是 4s, 所以每天爆块的数量应该是大于 2880 的
if days < int(build.MinDealDuration/builtin.EpochsInDay) {
printErr(xerrors.Errorf("minimum duration is %d days", int(build.MinDealDuration/builtin.EpochsInDay)))
continue
}修正也很简单,爆块的数量不要用固定值,应该根据网络实际爆块时间计算即可:
1
2
3
4
5
6// compatible with the 2k local net, we should calculate the value dynamically not use the fixed value 2880
dealDuration := int(build.MinDealDuration / (builtin.SecondsInDay / abi.ChainEpoch(build.BlockDelaySecs)))
if days < dealDuration {
printErr(xerrors.Errorf("minimum duration is %d days", dealDuration))
continue
}我本地网络爆块时间(
build.BlockDelaySecs)设置的是 10 秒,那么对于我当前网络来说,只要订单时间大于 60 天就够了。订单提交成功之后,网络会为存储订单预留资金(其实就是锁定订单资金),并提交消息上链:
1
2
3Stage: ReserveClientFunds: Reserving client funds (expected duration: a few minutes)
Mar 8 02:16:13 funds reserved, amount <3376113281250>
Mar 8 02:16:14 reserving funds for storage deal, message cid: <bafy2bzacedc75qiv6s37apblncpi72af6oq5nfx5pkeczfhzpiefkwsctu7ks>Miner 接收到订单,然后开始传输订单,订单传输完成之后,进入一个预发布状态,Miner 接收订单之后不会立即发布的,所以默认要累积满 8 笔订单或者等待 1 个小时后才会自动发布,
因为发布上链要手续费。我们这是测试,不差钱,直接手动强制发布:1
2
3
4
5
6
7
8
9
10
11
12# 可以先列出有哪些可以发布的订单
yangjian@RockYang:~$ lotus-miner storage-deals pending-publish
Publish period: 1h0m0s (ends in 59m56s)
First deal queued at: 2022-03-05 10:55:07.296090181 +0800 CST
Deals will be published at: 2022-03-05 11:55:07.296090181 +0800 CST
1 deals queued to be published:
ProposalCID Client Size
bafyreifnkpobxlv4lvfu7gjq2gvwcdly2lpwzr6zdiz25u55szr4asymke t1yq5ddr4xlikae7u3aop4suclfwoecoq5umogaby 8MiB
# 立即发布所有订单
yangjian@RockYang:~$ lotus-miner storage-deals pending-publish --publish-now
triggered deal publishing订单发布(上链)之后相当于告诉大家,这活我接了,立帖为证。
Miner 开始进行调度
snap-deal相关任务,先做AddPieces, 然后进入Packing,PR1,PR2等。所有任务流程做完之后,Miner 将结果(
ProveReplicaUpdate)重新上链,扇区重新变为Proving状态。
::: tip
下面是一个订单的状态变化日志,详细记录一个订单从发单到 Active 的过程:
:::
1 | yangjian@RockYang:/filecoin/lotus$ lotus client inspect-deal --proposal-cid=bafyreiemvhu6fhclojhnxsloonrchwhxbvecfbfzs3idjhndkmnpuzwrsq |
3. 扇区状态流程过程
AddPiece: 将订单数据分片,返回
PieceCID和订单信息,时间比较短,跟 CC 扇区的 AP 时间基本差不多。Packing: 将订单数据打包放入扇区。
ReplicaUpdate: 看日志貌似只是做了一次 Poseidon(哈希)计算,类似 PC2 的操作,耗时应该跟 PC2 差不多。
1
2
3
4
5
6
7
8
9
10
11
12
13
14
15
16
17
18
19
202022-03-09T17:49:56.182 INFO filcrypto::proofs::api > fil_empty_sector_update_encode_into: start
2022-03-09T17:49:56.182 INFO filecoin_proofs::api::update > encode_into:start
2022-03-09T17:49:56.182 INFO storage_proofs_update::vanilla > new replica path "/cache/p1/update/s-t01000-101", len 8388608
2022-03-09T17:49:56.182 INFO storage_proofs_update::vanilla > sector key path "/cache/p1/sealed/s-t01000-101", len 8388608
2022-03-09T17:49:56.182 INFO storage_proofs_update::vanilla > staged data path "/cache/p1/unsealed/s-t01000-101", len 8388616
2022-03-09T17:49:56.182 INFO storage_proofs_core::data > restoring /cache/p1/unsealed/s-t01000-101
2022-03-09T17:49:56.278 INFO storage_proofs_porep::stacked::vanilla::proof > generating tree r last using the GPU
2022-03-09T17:49:56.292 INFO neptune::proteus::program > Using kernel on OpenCL.
2022-03-09T17:49:56.379 INFO storage_proofs_porep::stacked::vanilla::proof > building base tree_r_last with GPU 1/1
2022-03-09T17:49:56.446 INFO filecoin_proofs::api::update > encode_into:finish
2022-03-09T17:49:56.446 INFO filcrypto::proofs::api > fil_empty_sector_update_encode_into: finish
...
2022-03-09T17:49:56.517 DEBUG merkletree::merkle > generated partial_tree of row_count 4 and len 585 with 8 branches for proof at 233336
2022-03-09T17:49:56.517 DEBUG merkletree::merkle > generated partial_tree of row_count 4 and len 585 with 8 branches for proof at 63954
2022-03-09T17:49:56.517 INFO storage_proofs_update::vanilla > finished generating challenge-proofs for partition k=2
2022-03-09T17:49:56.517 INFO storage_proofs_update::vanilla > finished generating challenge-proofs for partition k=0
2022-03-09T17:49:56.517 INFO storage_proofs_update::vanilla > finished generating challenge-proofs for partition k=3
2022-03-09T17:49:56.517 INFO storage_proofs_update::vanilla > Finished generating all partition proofs
2022-03-09T17:49:56.517 INFO filecoin_proofs::api::update > generate_partition_proofs:finish
2022-03-09T17:49:56.517 INFO filcrypto::proofs::api > fil_generate_empty_sector_update_partition_proofs: finishProveReplicaUpdate1: 类似 C1 的计算,耗时很短。
ProveReplicaUpdate2: 做了一次零知识证明,应该是类似 C2 的计算,耗时也跟 C2 差不多。
1
2
3yangjian@RockYang:~$ lotus-miner sealing jobs
ID Sector Worker Hostname Task State Time
1e9ec38e 80 637b211a c2-yyyun-3950x PR2 running 40.1sReplicaUpdateWait: 这里要将
ProveReplicaUpdate的结果上链。FinalizeReplicaUpdate: 跟 Finalize 类似的操作,清理缓存,将计算结果下载到最终存储目录。
UpdateActive: 等待重新激活扇区,这个过程要等待 2h30min,类似
WaitSeed之类的过程。Proving: 重新变回 Proving 状态,
snap-deal升级完成。
4. Snap-Deal 性能
上述流程关于任务耗时方面的统计都是估算数据,并非精确统计。由于 8MiB 扇区计算任务的时间都非常短,所以统计时间的误差会比较大。
官方提供一份关于 RU,PR2 和 C2 的性能对比:
| Provider Hardware | UpdateReplica (RU) | ProveReplicaUpdate(PR2) | ProveCommit(C2) |
|---|---|---|---|
| CPU: 3975WX GPU: 2x RTX 3090 (CUDA) RAM: 512 GB SWAP: 0 GB Sector: 32 GiB |
5m 38s | 7m 52s | 6m 57s |
| CPU: EPYC 7F72 GPU: 2x RTX 2080ti (CUDA) RAM: 256 GB SWAP: 20 GB Sector: 64 GiB |
9m 19s | 19m 0s | 16m 10s |
| CPU: EPYC 7502 GPU: RTX 3080 (CUDA) RAM: 512 GB SWAP: 0 GB Sector: 64 GiB |
12m 59s | 23m 13s | 23m 13s |
详细的测试数据 Github 讨论组里面还有一份 Snap Deal Performance。
5. 扇区文件流转过程
本次更新之后,所有的 Storage (包括 Miner 和所有的 Worker) 根目录下都多了两个目录,之前只有 unsealed,cache,sealed 三个目录, 现在多了 update 和 update-cache 两个目录。
这两个目录是专门用于服务 snap-deal 的。
- Miner 接单之后开始做
AddPieces操作,这时会在lotus-ap-worker的unsealed目录生产一个SectorSize大小的扇区文件。 - 进入
ReplicaUpdate阶段之后,unsealed 文件会被下载到开启了 ReplicaUpdate 功能的 Worker(这里是 lotus-p1-worker) 上。在整个 ReplicaUpdate 任务过程中会在 5 个目录中生成扇区文件:- unsealed: 从
lotus-ap-worker下载过来的 - sealed: 我对比过这个文件跟 Miner 上最终落盘的 sealed 文件的 SHA1 文件签名,发现完全一致,需要进一步阅读源码才能确认是下载还是重新生成的。
- cache: 同 sealed 文件一样,很可能也是直接从 Miner 下载的。
- update: 重新生成的,大小跟 sealed 文件一样,但是内容不一样。
- update-cache: 相比 cache 的目录结构,只多了一个
sc-02-data-tree-d.dat文件,大小是 2 倍SectorSize, 其他所有的文件虽然看起来大小都没有变,但是内容都不一样了,所以应该都是重新生成的。
- unsealed: 从
6. 一些遗留问题
在测试中遇到了一些疑问,大部分都解决了,有几个问题我反复测试都没有搞明白,在此抛砖引玉,希望指导答案的同学能够解惑,发我邮箱(yangjian102621@163.com)或者微信(yangjian102621)都可以,不胜感激!!!
我测试了好几遍,整个过程中都没有发现
RegenSectorKey这个事件,Miner 任务调度日志和 Worker 的运行日志都没有打印出来相关的信息。
我查看了这个扇区的事件日志,也没有发现,只有在最后扇区Proving的时候有一个SectorKeyReleased事件,那么RegenSectorKey这个事件到底在哪触发的呢?1
2
3
4
5
6
7
8
9
10
11
12
13
1410. 2022-03-08 09:43:36 +0800 CST: [event;sealing.SectorProving]
11. 2022-03-08 09:44:10 +0800 CST: [event;sealing.SectorFinalized]
12. 2022-03-08 10:14:58 +0800 CST: [event;sealing.SectorStartCCUpdate]
13. 2022-03-08 10:20:26 +0800 CST: [event;sealing.SectorAddPiece]
14. 2022-03-08 10:20:26 +0800 CST: [event;sealing.SectorPieceAdded]
15. 2022-03-08 10:20:26 +0800 CST: [event;sealing.SectorStartPacking]
16. 2022-03-08 10:20:26 +0800 CST: [event;sealing.SectorPacked]
17. 2022-03-08 10:20:26 +0800 CST: [event;sealing.SectorReplicaUpdate]
18. 2022-03-08 10:22:13 +0800 CST: [event;sealing.SectorProveReplicaUpdate]
19. 2022-03-08 10:22:13 +0800 CST: [event;sealing.SectorReplicaUpdateSubmitted]
20. 2022-03-08 10:23:26 +0800 CST: [event;sealing.SectorReplicaUpdateLanded]
21. 2022-03-08 10:23:26 +0800 CST: [event;sealing.SectorFinalized]
22. 2022-03-08 12:54:36 +0800 CST: [event;sealing.SectorUpdateActive]
23. 2022-03-08 12:54:36 +0800 CST: [event;sealing.SectorKeyReleased]测试过程我发现订单大小和文件大小明显不相符合,我测试的 80 号扇区,存的是一张 7.4 MiB 的图片,在订单列表 (
lotus-miner storage-deals list) 里面显示的订单大小是 8MiB,这个应该是扇区补齐的原因1
2
3
4
5
6
7
8ProposalCid DealId State Client Size Price Duration
...npuzwrsq 2 StorageDealActive t1j44g5ma5i6emw7423ncmgxcq2fr567nkyryvzaq 8MiB 0.00000337611328125 FIL 864285
...yxrciaim 3 StorageDealActive t1j44g5ma5i6emw7423ncmgxcq2fr567nkyryvzaq 8MiB 0.0000034089765625 FIL 872698
...g2ozpes4 5 StorageDealActive t1j44g5ma5i6emw7423ncmgxcq2fr567nkyryvzaq 64KiB 0.000000027241518839 FIL 892667
...chxxazsm 7 StorageDealActive t1j44g5ma5i6emw7423ncmgxcq2fr567nkyryvzaq 8MiB 0.000003754953125 FIL 961268
...g765thha 9 StorageDealActive t1j44g5ma5i6emw7423ncmgxcq2fr567nkyryvzaq 8MiB 0.00000375201171875 FIL 960515
...4iak3ztq 10 StorageDealActive t1j44g5ma5i6emw7423ncmgxcq2fr567nkyryvzaq 128KiB 0.00000005289427377 FIL 866622
...2wfdhyzi 11 StorageDealActive t1j44g5ma5i6emw7423ncmgxcq2fr567nkyryvzaq 8MiB 0.00000338153515625 FIL 865673但是等扇区升级完成之后我在扇区列表 (
lotus-miner sectors list) 显示的却是 4.436MiB:1
2
3
4
5
6
780 Proving YES YES 1549571 (in 25 weeks 2 days) 1 4.463MiB
81 Proving YES YES 1549572 (in 25 weeks 2 days) 1 4.507MiB
82 Proving YES YES 1549573 (in 25 weeks 2 days) 1 36.94KiB
84 Proving YES YES 1549575 (in 25 weeks 2 days) 1 4.967MiB
100 Proving YES YES 1549591 (in 25 weeks 2 days) 1 4.966MiB
101 UpdateActivating YES YES 1549592 (in 25 weeks 2 days) 1 72.13KiB
113 Proving YES YES 945297 (in 15 weeks 2 days) 1 7.409MiB我怀疑订单数据是被压缩重新编码之后才存入扇区,但是我没有证据,需要进一步研读源码才能得到答案。
::: tip
如果上述问题有进展的话我会再写一篇文章阐述清楚,也希望有答案或者有兴趣的同学跟我们一起探讨交流。
吃饭去了,拜了个拜 O(∩_∩)O~
:::